Abstract: This study investigates the manufacturing process of a ¢50.8 mm × 0.89 mm ultra-thin-wall S32750 super duplex stainless steel welded pipe. High-performance ultra-thin-wall welded pipes were successfully produced using DC tungsten inert gas (TIG) welding combined with an innovative double-radius W-type reverse-bending cold-forming process and a weld-seam leveling technique. The results indicate that the mechanical properties, process performance, and corrosion resistance of the fabricated welded pipes fully comply with all applicable standards. The weld seam shows smooth, well-formed morphology with a uniform transition and no defects such as undercut. Microstructural analysis reveals that the weld zone consists of uniformly distributed ferrite and austenite phases. Hardness testing shows that the weld seam, heat-affected zone, and base metal all have hardness values ≤300 HBW, with differences between the regions controlled within 15 HBW. Wastewater treatment evaporators are critical components of wastewater treatment systems in thermal power plants. Their core operating principle is to use thermal energy to evaporate the water in wastewater into steam, which is then condensed into clean water, thereby achieving wastewater purification. The heat-exchange tube is the key component of a wastewater treatment evaporator, and its material properties and structural characteristics directly affect the evaporator’s overall performance. Through the arrangement and physical properties of the heat-exchange tubes, fluids at different temperatures flow inside or outside the tubes to facilitate effective heat transfer. Wastewater from thermal power plants contains high concentrations of chloride ions and is therefore strongly corrosive. Therefore, the heat-exchange tube material must possess excellent resistance to chloride corrosion and be capable of withstanding high temperatures and pressures. S32750 super duplex stainless steel combines the strengths of austenitic and ferritic stainless steels, providing excellent mechanical properties and superior resistance to chloride-induced corrosion. It has been widely applied in the energy, power, petrochemical, and marine engineering sectors and has attracted growing attention from researchers. Zhang Xianjiang et al. developed a 610 mm × 6.35 mm S32750 super duplex stainless steel pipe for seawater pipeline systems using plasma arc welding with filler metal and found that, even without heat treatment, the pipe’s tensile strength, bending performance, hardness, and corrosion resistance all met the relevant standards and typical operational requirements. Qin Xingwen et al. investigated the microstructure and mechanical properties of cold-rolled, small-diameter S32750 super duplex stainless steel pipes (¢14.7 mm × 1 mm). Their results indicated that with increasing solution-treatment temperature, grain growth followed a rapid–slow–rapid pattern, while austenite gradually decomposed and transformed into ferrite. When S32750 super duplex stainless steel was held at 980–1140°C for 5 minutes, the effects of precipitates, ferrite content, and grain size on its strength gradually diminished. In summary, previous studies have thoroughly investigated the microstructure and properties of S32750 super duplex stainless steel welded pipes across small, large, and thick-wall diameters. However, studies on the fabrication of large-diameter, ultra-thin-wall S32750 super duplex stainless steel welded pipes using DC TIG welding, along with their mechanical properties, process performance, weld morphology, microstructure, and corrosion resistance, are still limited. This lack of research has impeded the advancement of large-diameter, ultra-thin-wall S32750 welded pipes. This study presents and assesses a manufacturing process for ¢50.8 mm × 0.89 mm ultra-thin-wall S32750 super duplex stainless steel welded pipes, aiming to enable the large-scale production of ultra-thin-wall S32750 pipes for industrial applications.
The S32750 super duplex stainless steel strip used in this study was supplied in a cold-rolled, annealed condition, with dimensions of 158.5 mm × 0.89 mm. The material conforms to ASTM A240/A240M—2023, “Standard Specification for Chromium and Chromium-Nickel Stainless Steel Plates, Sheets, and Strips for Pressure Vessels and General Applications.” The chemical composition and mechanical properties of the strip are summarized in Table 1.
Table 1 Chemical Composition and Mechanical Properties of S32750 Super Duplex Stainless Steel Strip
|
Item
|
Chemical Composition (Mass Fraction, %)
|
Mechanical Properties
|
|
C
|
Si
|
Mn
|
P
|
S
|
Cr
|
Ni
|
Cu
|
Mo
|
N
|
PREN®
|
RmMPa
|
Rp0.2/
MPa
|
Asl
%
|
Hardness
HBW
|
|
Measured Values
|
0.0157
|
0.510
|
1.119
|
0.0223
|
0.0006
|
25.42
|
6.260
|
0.076
|
3.650
|
0.002 520
|
41.5
|
935
|
695
|
25
|
280
|
|
Standard Requirements
|
0.03
|
0.8
|
1.2
|
0.035
|
0.02
|
24.0-26.0
|
6.0-8.0
|
0.5
|
3.0-5.0
|
0.24-0.32
|
≥41
|
=795
|
≥ 550
|
≥15
|
≤310
|
Note:
According to ASTM A789/A789M—2024, Ferritic–Austenitic Stainless Steel Seamless and Welded Tubes for General Service, the pitting resistance equivalent number (PREN) is calculated as follows:
PREN=w(Cr)+3.3×w(Mo)+16×w(N)
The experiment was conducted using an XC60 automated longitudinal welded stainless steel pipe production line. The processing route was as follows:
- Strip → Cold bending
- Edge joining → Outer weld polishing → Inner weld leveling
- Primary sizing → Online annealing → Secondary sizing
- Eddy current testing → Laser diameter measurement → Main line length cutting (for performance inspection)
- Ultrasonic testing → Underwater airtightness testing → Packaging
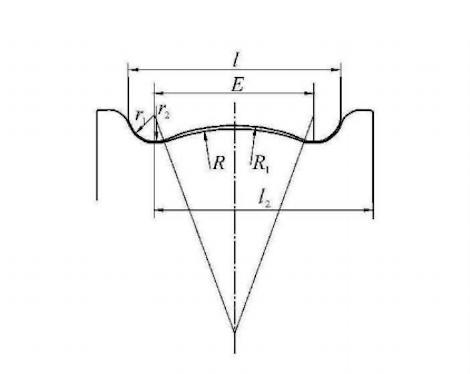
The strip was formed by alternating cold bending using nine sets of vertical rollers and eight sets of horizontal rollers arranged in a specific configuration. Both the vertical and horizontal roller dies were made of die steel. The experimental S32750 super duplex stainless steel strip had a yield strength of 695 MPa and an ultra-thin thickness of just 0.89 mm. The resulting welded pipe, measuring 50.8 mm × 0.89 mm, featured an exceptionally low wall-to-diameter ratio of 1.75%. Cold bending of such an ultra-thin strip is considerably more difficult than bending thick-walled strips, and precise control of edge-forming quality is especially critical. As edge-forming quality directly influences weld quality, its control is particularly crucial during cold bending. The 50.8 mm × 0.89 mm ultra-thin-walled S32750 welded pipe was produced using a double-radius W reverse-bending method. The arc profile of the first pair of flat rollers in this forming process is illustrated in Figure 1. The welding process utilized single-torch automatic tungsten inert gas (TIG) autogenous welding, applying single-sided welding with double-sided weld formation. Both the internal and external welding positions, along with the welding torch, were protected using 99.99% pure argon gas to prevent high-temperature oxidation of the weld and base metal. The experimental welding speed was set at 1 m/min.

Figure 1 Schematic Diagram of the Arc Shape of the First Pair of Flat Rollers in the Double-Radius W Reverse-Bending Forming
l2-r1 — distance from the arc center to the reference plane
E — center distance
l — maximum double-radius arc distance
R — lower roller reverse-arc radius
R1 — upper roller reverse-arc radius
The welding parameters for the S32750 welded pipe are listed in Table 2.
Table 2 Welding Process Parameters for S32750 Welded Pipe
|
Current / A
|
Voltage / V
|
Torch Angle / °
|
Shielding Gas Flow Rate (L·min⁻¹)
|
|
107
|
10.7
|
72
|
15 (inside) / 15 (outside)
|
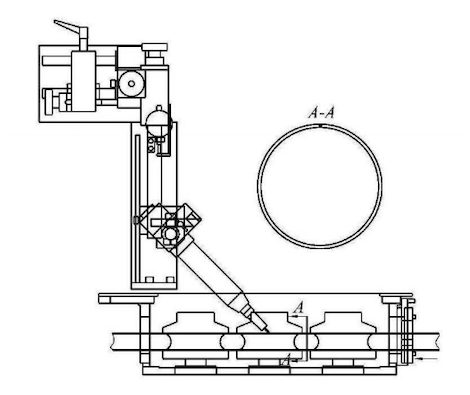
Prior to welding, oil, burrs, and other contaminants were thoroughly removed from the strip edges. The vertical position and clamping force of the welding rollers were carefully adjusted to maintain edge misalignment within 0.05 mm and the assembly gap within 0.5 mm. The welding process for the S32750 welded pipe is illustrated in Figure 2.

Figure 2: Schematic diagram of the TIG welding process for the S32750 welded pipe
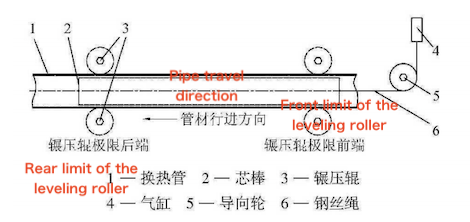
After welding, visual inspection of both the inner and outer weld seams confirmed that the weld surfaces were smooth, flat, and seamlessly transitioned with the base metal, exhibiting no visible defects such as undercut, excessive reinforcement, dents, porosity, cracks, or incomplete penetration. For welded pipes used in water treatment applications, excessive weld reinforcement on the inner surface can cause multiple adverse effects. First, excessive weld reinforcement can lead to stress concentration, which reduces the fatigue strength of the welded joint and consequently shortens its service life. Additionally, excessive internal weld height increases flow resistance, resulting in higher energy losses during fluid transport. It may also adversely affect pipe expansion during hydrostatic testing, potentially causing a “small straight-edge” deformation that compromises the normal operation of the pipeline. To control weld reinforcement, an internal weld-leveling process was employed. A steel mandrel of fixed length was connected to a cylinder via a steel wire rope, enabling the mandrel to be retracted to its original position. A pair of upper and lower steel rollers encircled the welded pipe, positioned perpendicular to the weld seam. Within the mandrel’s length, a hydraulic mechanism applied the necessary rolling force to the rollers, repeatedly leveling the weld reinforcement until it was flush with the base metal, resulting in a smooth, uniform, and bright weld surface. After weld leveling, online annealing was carried out at temperatures ranging from below 960°C to 1100°C, corresponding to 25%–30% of the annealing furnace’s rated power, with both the inside and outside of the pipe protected by 99.99% pure argon to prevent high-temperature oxidation.
Two axial cross-sectional weld specimens, each measuring 10–15 mm in length, were prepared from the welded pipe using a laser cutting machine. The weld cross-sections were ground and polished, and their macroscopic morphology was examined using an XJZ-6A metallographic microscope. Inspection revealed that the thickness differences between the weld, Fusion Line 1, Fusion Line 2, and the base metal were all maintained within 0.019 mm. The welds were smooth, with no cracks, incomplete penetration, lack of fusion, or undercut. Weld reinforcement was well controlled, resulting in excellent macroscopic weld morphology. The macroscopic dimensions of the S32750 welded pipe specimens are summarized in Table 3.
Table 3. Macroscopic Dimensions of Welds in S32750 Welded Pipe Samples (mm)
|
Maximum Weld Thickness
|
Fusion Line 1 Thickness
|
Fusion Line 2 Thickness
|
Base Metal Thickness
|
Excess Height (≤0.05 mm)
|
|
0.883, 0.883
|
0.850, 0.863
|
0.870, 0.854
|
0.869, 0.865
|
0.014, 0.018
|
Room-temperature mechanical tests of the 50.8 mm × 0.89 mm welded pipes were carried out following the ASTM A789/A789M—2024 standard. Tensile and hardness specimens were prepared and tested using a CMT5105 universal testing machine and a 402MVA Brinell hardness tester, respectively. The results indicated that the tensile strength, yield strength, and elongation of the welded pipes all complied with the requirements of ASTM A 789/A 789M—2024. Hardness measurements showed that the weld metal had the highest hardness, the base metal was intermediate, and the heat-affected zone (HAZ) exhibited the lowest hardness. The hardness of the weld, HAZ, and base metal were all ≤300 HBW, with a maximum hardness difference of 6 HBW among the three regions. The room-temperature mechanical properties of the S32750 welded pipes are summarized in Table 4.
Table 4. Room-Temperature Mechanical Properties of S32750 Welded Pipe
|
Item
|
Rm / MPa
|
Rp0.2/ MPa
|
A50/ %
|
Hardness HBW
|
|
Weld
|
901, 898
|
686, 687
|
35.5, 32.5
|
291, 292
|
|
Base Metal
|
—
|
—
|
—
|
287, 288
|
|
Heat-Affected Zone
|
—
|
—
|
—
|
285, 286
|
|
ASTM A 789/A 789M—2024 Requirements
|
≥800
|
≥550
|
≥15
|
≤300
|
Process performance tests—including reverse bending, flattening, flaring, and edge rolling—were performed on the 50.8 mm × 0.89 mm welded pipes in accordance with ASTM A 789/A 789M—2024 requirements. No visible cracks were observed on the surfaces of the reverse-bent, flattened, flared, and edge-rolled samples, indicating that all process performance tests met the required standards. None of the test specimens exhibited visible surface cracks, and all process performance tests successfully met the required acceptance criteria. Eddy current and ultrasonic inspections were subsequently performed on the 50.8 mm × 0.89 mm welded pipes in accordance with ASTM A 789/A 789M—2024, confirming the absence of internal and near-surface defects. Eddy current testing, which operates on the principle of electromagnetic induction, was employed to detect significant intermittent or abrupt defects on the surface and near-surface areas of both the weld and the base metal. Ultrasonic testing, exploiting the propagation characteristics of ultrasonic waves in super duplex stainless steel, was used to effectively identify internal defects—including cracks, porosity, and slag inclusions—as well as external damage and deformation. Before inspection, the equipment was calibrated using sample pipes. Eddy current testing was performed with an IDEAO102 unit, ensuring that the probe-to-pipe coverage ratio was maintained at no less than 0.8. The ultrasonic flaw detector employed was model FD4 (UT-50mmSL.14C FD4). The calibration sample contained an artificial U-shaped notch on the weld seam, with dimensions not exceeding 0.22 mm × 0.11 mm × 12.7 mm (width × depth × length). An airtightness test was conducted on the 50.8 mm × 0.89 mm welded pipes in accordance with ASTM A 1016/A 1016M. This test assesses the pipes’ sealing performance to ensure leak-free operation and prevent potential safety hazards during service. The test was conducted at a pressure of ≥1.0 MPa with a holding time of ≥10 s, and all welded pipes passed. A 24-hour corrosion test was carried out on six samples annealed at different temperatures, following Method C of ASTM A 923—2014, “Standard Test Method for Determination of Detrimental Intermetallic Phases in Duplex Austenitic/Ferritic Stainless Steels.” The results are summarized in Table 5.
Table 5. Corrosion Performance of S32750 Welded Pipe Samples
|
Annealing Furnace Power Ratio¹
|
Annealing Temperature
|
Weight Loss / mg
|
Corrosion Evaluation
|
|
25%
|
<960°C
|
Perforation
|
Unacceptable
|
|
26%
|
<960°C
|
Perforation
|
Unacceptable
|
|
27%
|
≤960°C
|
Perforation
|
Unacceptable
|
|
28%
|
960°C
|
30.7 mg
|
Unacceptable
|
|
29%
|
1050°C
|
0 mg
|
Acceptable
|
|
30%
|
1100°C
|
0 mg
|
Acceptable
|
Note: Percentage of the rated power of the annealing furnace
During the production of S32750 super duplex stainless steel heat-exchange tubes, the combined effects of gravity, shielding gas, and arc force cause the internal weld bead to protrude above the inner surface, resulting in excess weld reinforcement. In high-temperature, high-pressure, and high-velocity fluid environments, such excessive weld reinforcement can markedly impair the overall performance of the evaporator. Therefore, internal weld leveling is essential, as it eliminates the excess weld height and ensures the heat-exchange tube maintains proper flow characteristics and structural integrity. The internal weld leveling process for the S32750 welded tubes is illustrated in Figure 3.

1 — Heat-exchange tube
2 — Mandrel
3 — Rolling pressure
4 — Cylinder
5 — Guide wheel
6 — Wire rope
Figure 3. Schematic diagram of the internal weld leveling process for the S32750 welded tube
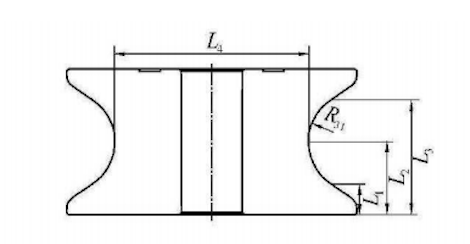
The mandrel is made from cold-worked die steel, offering excellent toughness, high hardness, strong strength, and outstanding wear resistance. To accommodate the high tensile and yield strength of S32750 super duplex stainless steel and further prolong tool life, the mandrel’s outer surface is coated with a DLC (diamond-like carbon) layer. Hydrogenated diamond-like carbon (DLC) coatings are primarily composed of carbon, forming a non-crystalline hard film that incorporates both graphite (sp²) and diamond (sp³) bonding structures. Even without lubrication, DLC coatings demonstrate a low friction coefficient of 0.05–0.10 and a hardness reaching up to 2300 HV. Their nano-single-layer or composite structure offers excellent anti-adhesion properties, high hardness, and outstanding wear resistance. Depending on the leveling equipment model, the mandrel length (L) should range from 280 to 310 mm, with an outer diameter of 47.6–47.8 mm. An excessively large mandrel diameter can cause scratches from friction with the tube’s inner wall, whereas an undersized diameter reduces contact with the weld, resulting in inadequate smoothing of the weld surface. Furthermore, a mandrel that is too small can lead to excessive reduction of the tube’s outer diameter in the vertical direction during rolling, negatively impacting the accuracy of subsequent pipe sizing. To decrease the mandrel’s weight and prevent scratches on the tube caused by excessive mass, a central axial hole with a 15 mm inner diameter is machined into the mandrel. The upper and lower leveling rollers are precisely contoured to match the tube’s outer circumference, ensuring the tube maintains its arc shape and preventing deformation during the weld-leveling process. Figure 4 illustrates the structure and dimensional parameters of the upper and lower leveling rollers used inside the S32750 welded tube.

L₁ — Minimum distance from the arc to the reference surface
L₂ — Distance from the arc center to the reference surface
L₃ — Maximum distance from the arc to the reference surface
L₄ — Bottom diameter of the roller arc
Figure 4 Schematic diagram of the upper and lower internal leveling rollers for the S32750 welded tube
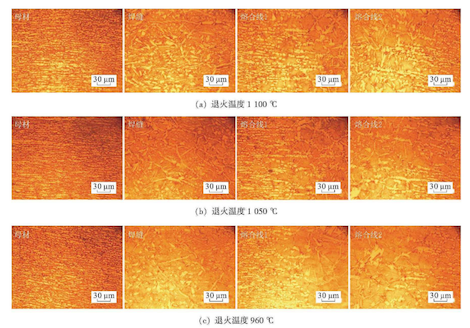
Corrosion tests show that welds annealed at ≤960 °C experience corrosion, while those annealed at 1050–1100 °C remain free of corrosion. Metallographic analysis was performed on Ø50.8 mm × 0.89 mm welded pipes following ASTM A923-2014. Specimens were prepared from pipe samples annealed at various temperatures for microstructural examination. The specimens were subjected to rough grinding, fine grinding, polishing, and etching, and their microstructures were subsequently observed under an XJZ-6A metallographic microscope, as illustrated in Figure 5. The results indicate that the base metal, weld metal, and heat-affected zone all exhibit a duplex microstructure consisting of austenite and ferrite. With increasing annealing temperature, the austenite content in the weld rises markedly, and abundant intragranular austenite forms, a microstructural development that effectively improves the weld’s corrosion resistance.

(a) Annealing temperature 1100 °C (b) Annealing temperature 1050 °C (c) Annealing temperature 960 °C
Figure 5: Metallographic microstructures of S32750 welded pipe samples
The double-radius W-type reverse-bending method effectively controls edge-forming quality in ultra-thin-walled S32750 super duplex stainless steel coal pipes, creating optimal conditions for achieving high-quality subsequent welding. Single-gun automatic tungsten inert gas (TIG) autogenous welding was employed, with the pipe welded from both sides using a single-sided welding approach. The internal and external weld surfaces are smooth and flat, with a uniform transition into the base metal, free of defects, exhibiting stable weld quality and high welding efficiency. The internal weld-leveling process, performed by repeatedly rolling and pressing the weld, efficiently eliminates excess weld height on both the inner and outer surfaces. After leveling, the weld is flush and smooth with the base material, enhancing the overall macroscopic appearance. Moreover, both the internal and external weld surfaces display a smooth, uniform, and naturally bright finish. At annealing temperatures of 1050–1100 °C, the welds show no signs of corrosion, demonstrating excellent corrosion resistance and fully meeting the relevant standards. The weld microstructure comprises ferrite and austenite, with hardness values of the heat-affected zone, weld metal, and base metal all ≤300 HBW, and the maximum hardness difference among them within 15 HBW. The manufactured 50.8 mm × 0.89 mm ultra-thin-walled S32750 super duplex stainless steel welded pipe fully satisfies ASTM standards for eddy-current testing, ultrasonic inspection, and airtightness testing.

