To reliably assess the quality of welds in large-diameter water supply pressure steel pipes, this study investigates non-destructive testing methods for evaluating weld stability. Based on the detection principles of ultrasonic time-of-flight diffraction (TOFD) technology, this technique is applied to the non-destructive inspection of weld defects in large-diameter water supply pressure steel pipes to determine defect type and depth. A municipal water supply steel pipe project is presented as a case study, in which ultrasonic TOFD technology is applied for weld inspection. The results indicate that this method can reliably identify both the presence and type of weld defects, achieving a defect depth measurement error of less than 0.2 mm. Furthermore, ultrasonic imaging of the welds clearly visualizes the spatial distribution of defects. Large-diameter water supply pressure steel pipes are essential components of municipal water supply and drainage systems. They endure high internal water pressure and play a direct role in ensuring the stability and safety of the entire water supply system. As an advanced inspection method, non-destructive testing enables the detection of internal and surface defects in steel pipes and weld seams without causing any structural damage.
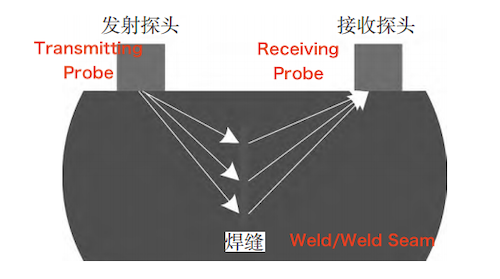
Ultrasonic time-of-flight diffraction (TOFD) is a widely used non-destructive testing technique that has shown excellent performance in a range of engineering applications. Ultrasonic TOFD employs a pair of probes to both transmit and receive ultrasonic waves. By analyzing the time difference between diffracted signals generated at defect tips and reference signals, defect location and size can be identified. Since diffracted waves exhibit weak directionality, they are easier to detect, significantly improving defect detection capability. The operating principle of ultrasonic TOFD technology is shown in Figure 1.

Figure 1. Principle of ultrasonic TOFD technology
Compared with conventional manual ultrasonic testing, ultrasonic TOFD technology offers significantly higher quantitative accuracy in measuring defect height, enabling a more precise assessment of defect size and severity. Consequently, ultrasonic TOFD is employed for the non-destructive testing of steel pipe welds to evaluate weld stability and detect the presence of defects.
When ultrasonic time-of-flight diffraction (TOFD) is used for non-destructive testing of steel pipe welds, the two probes of the flaw detector must be carefully adjusted to ensure optimal probe spacing. Proper adjustment minimizes the delay of the diffracted signal received by the moving probe and improves detection accuracy. The probes are positioned on opposite sides of the weld and accurately aligned above or below the suspected crack location at the center of the defect region.
Let the two probes be denoted as A and B, with a spacing of L, and let the ultrasonic wave propagation speed in the steel pipe be M. The distance d between the weld defect and the detection surface can then be calculated as follows:

where MMM represents the ultrasonic wave propagation velocity in the steel pipe.
During ultrasonic wave propagation, longitudinal waves are generated within the steel pipe, and their propagation velocity can be calculated using the following expression:

where E is the elastic modulus of the material, ρ is the density of the weld medium, K is the weld wave velocity constant, and A represents the weld crack height. When ultrasonic TOFD is applied to the non-destructive testing of pipe welds, the depth and detailed characteristics of weld defects can be determined based on the surface geometry of the weld structure. Real-time waveforms can be generated based on the phase characteristics obtained during the scanning process.
In addition, variations in the amplitude of pulse signals received by the probe can be utilized to identify weld seam features and locate defects. During pipe inspection, ultrasonic waves propagating within the pipe generate reflective surfaces within specific regions. The reflected and diffracted waves generated at these surfaces are captured by the receiving probe, ensuring the clear acquisition of diffracted wave signals. By analyzing changes in the phase and frequency of the diffracted waves, detailed information about the weld seam—such as defect size, type, and distribution—can be extracted, enabling accurate assessment of defect characteristics and severity. It is important to note that a blind zone occurs near the pipe surface during ultrasonic TOFD inspection.
The ultrasonic probe is used to capture defect signals from the surface blind zone to reliably evaluate weld quality, with the depth D of the blind zone calculated as follows:

where M is the ultrasonic wave propagation speed in the steel pipe, ttt is the propagation time, and L is the distance between the two probes. Through the above procedures and calculations, the stability of steel pipe weld seams can be effectively assessed using non-destructive testing. The resulting inspection data provide detailed information on defect size, location, and type, offering a reliable basis for assessing weld quality.
To evaluate the performance of ultrasonic time-of-flight diffraction (TOFD) technology for non-destructive testing of weld seams in large-diameter pressurized steel pipes, this study focuses on a municipal water supply pipeline in a representative city. Field tests were conducted on the pipeline, and the effectiveness of the TOFD inspection method was systematically evaluated. The pipeline uses pressurized steel pipes, externally lined with precast concrete segments of strength grade C55, and an inner steel pipe made from Q355C structural steel. The pipe has a wall thickness of 20 mm and an inner diameter of 4800 mm. During installation, each 12 m segment serves as a standard construction unit, composed of four equally long steel pipe sections connected by welding. In addition, ten reinforcing rings made of the same material as the pipe are installed on the outer surface of each standard segment to enhance structural strength and stability.
Because the pipeline studied is a large-diameter water supply line, flux-cored arc welding with gas shielding (FCAW-G) was employed to ensure high welding quality and reliable service performance. FCAW-G utilizes a combined slag and gas shielding mechanism, effectively preventing harmful gases from entering the weld zone. Simultaneously, the relatively long duration of the molten weld pool allows gases to escape, resulting in low hydrogen content in the weld metal and strong resistance to porosity.
In addition, this welding process produces a good weld bead appearance, a narrow heat-affected zone, and a high first-pass success rate, making it well suited for on-site construction and high-quality welding of large-diameter pipelines. Accordingly, FCAW-G was employed for all welding operations during the construction of the municipal water supply pipeline studied. The welding parameters were controlled as follows: a current of 150–170 A, an arc voltage of 18–20 V, a welding speed of 35–40 cm/min, and a shielding gas flow rate of 20–35 L/min. The thickness of each weld layer was maintained at 2–3 mm to effectively minimize the risk of crack formation. After welding was completed, non-destructive testing was performed using the ultrasonic TOFD method described in this study to assess weld quality and verify the effectiveness and applicability of the inspection technique.
Based on the non-destructive testing requirements for engineering welds, the ultrasonic TOFD system selected for this study is the M2M Mantis. This instrument is a multifunctional ultrasonic flaw detector that integrates conventional ultrasonic testing (UT), phased array ultrasonic testing (PAUT), time-of-flight diffraction (TOFD), and total focusing method (TFM). It can meet the inspection requirements for weld seams in steel pipes of different materials and specifications. The system supports various probe configurations—including linear array, dual-linear array, and matrix (area) array probes—greatly enhancing inspection flexibility and detection capability. Using this equipment, comprehensive non-destructive testing of steel pipe welds was performed, including longitudinal and transverse weld defect detection, as well as weld surface inspection. Table 1 lists the main technical specifications of the ultrasonic testing equipment.
|
Parameter
|
Value
|
|
Display resolution
|
1024 × 768 px
|
|
PAUT channel configuration
|
32:128PR
|
|
Supported probe type
|
Dual-crystal linear array
|
|
Power supply
|
15 V / 6 A
|
|
Connection and communication interface
|
LEM000 conventional ultrasonic interface
|
|
Operating frequency range
|
0–20 kHz
|
|
Total number of channels
|
64
|
|
Maximum sampling frequency
|
100 MHz
|
|
Pulser type
|
Negative square wave
|
|
Pulser pulse width
|
35–1250 ns
|
|
UT–TOFD channel pulse width
|
35–1250 ns
|
|
Maximum receiver input signal (PA channel)
|
2 Vpp
|
|
Receiver gain (PA channel)
|
120 dB
|
|
Receiver channel crosstalk
|
< 50 dB
|
During field testing, the ultrasonic probes were installed and configured as follows:
Longitudinal Weld Defect Detection
For longitudinal weld inspection, ultrasonic probes were positioned on the pipe surface at incidence angles of 45° and 60°. The shear waves generated by the probe were oriented perpendicular to the weld direction, allowing effective scanning of the weld zone and detection of internal defects along the weld length.
Transverse Weld Defect Detection
For transverse weld inspection, the ultrasonic probe was positioned at a 45° angle along the weld seam. This configuration enabled the probe to scan along the weld, enhancing sensitivity to defects oriented transverse to the weld.
Weld Surface Inspection
Weld surface inspection was conducted using longitudinal waves at a 0° incidence angle, with the probe positioned perpendicular to the weld surface. This setup enabled the detection of near-surface and surface-breaking defects.
Using the selected ultrasonic testing equipment, non-destructive testing (NDT) was carried out on the pipeline welds to identify the presence, location, and type of weld defects. Due to space limitations, the inspection results of 10 welds are randomly selected and presented in Table 2.
|
Weld No.
|
Inspection Result
|
Defect Location
|
|
1
|
Pass
|
—
|
|
2
|
Pass
|
—
|
|
3
|
Incomplete fusion
|
Internal (embedded)
|
|
4
|
Incomplete penetration
|
Outer surface
|
|
5
|
Incomplete fusion
|
Internal (embedded)
|
|
6
|
Incomplete fusion
|
Internal (embedded)
|
|
7
|
Incomplete penetration
|
Outer surface
|
|
8
|
Pass
|
—
|
|
9
|
Incomplete fusion
|
Internal (embedded)
|
|
10
|
Incomplete fusion
|
Internal (embedded)
|
The results in Table 2 demonstrate that the ultrasonic non-destructive testing method evaluated in this study can effectively inspect each steel pipe weld, accurately identify the presence or absence of defects, and reliably determine the type and location of any weld defects. These findings indicate that ultrasonic testing, particularly TOFD-based inspection, is highly applicable and reliable for evaluating weld quality in large-diameter water supply pressure steel pipes.
To further validate the effectiveness of the proposed inspection method, 10 steel pipe welds were randomly selected for defect depth measurement, and the corresponding results are summarized in Table 3.
|
Weld No.
|
Defect Depth (mm)
|
Measurement Error (mm)
|
|
1
|
4.3
|
0.12
|
|
2
|
3.2
|
0.11
|
|
3
|
2.2
|
−0.19
|
|
4
|
1.4
|
0.10
|
|
5
|
3.9
|
0.10
|
|
6
|
4.2
|
—
|
|
7
|
7.2
|
0
|
|
8
|
9.8
|
−0.10
|
|
9
|
5.8
|
0
|
|
10
|
6.7
|
−0.15
|
Analysis of the results in Table 3 indicates that the ultrasonic non-destructive testing method presented in this study can accurately determine the depth of weld defects in steel pipe welds. The measurement errors are all within ±0.2 mm, meeting the accuracy requirements for inspecting welds in large-diameter pressurized steel pipes. Therefore, this method allows for a comprehensive evaluation of weld quality and provides a reliable technical basis for assessing the structural integrity and operational safety of municipal water supply pipelines.
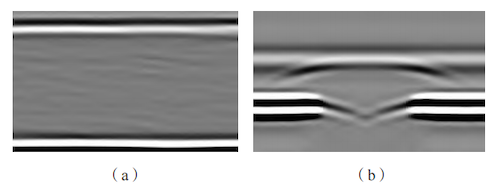
To visually demonstrate the effectiveness of the proposed non-destructive testing method, ultrasonic TOFD imaging was performed on both defect-free and defective welds after inspecting the test steel pipes using the method presented in this study. The applicability and detection performance of the method were assessed based on these imaging results, as illustrated in Figure 2.

Figure 2. Ultrasonic imaging results of weld inspection
(a) Ultrasonic image of a defect-free weld (b) Ultrasonic image showing internal weld defects
Analysis of the results in Figure 2 indicates that ultrasonic TOFD imaging can clearly reveal the distribution and morphology of weld defects during non-destructive testing of steel pipe welds. The defect-free weld produces a continuous, uniform signal, whereas internal defects generate distinct diffraction indications with well-defined boundaries. These results demonstrate that the proposed method satisfies the non-destructive testing requirements for weld seams in large-diameter water supply pressure steel pipes, providing a reliable technical basis for pipeline welding quality inspection and acceptance.
To ensure reliable and effective non-destructive testing of weld seams in large-diameter water supply pressure steel pipes, this study examined the application of ultrasonic Time-of-Flight Diffraction (TOFD) technology. The method employs diffracted ultrasonic signals to precisely determine the relative positions of weld defects and inspection probes. Through signal processing, the acquired data are transformed into TOFD images, providing rich quantitative and visual information that facilitates accurate identification and characterization of weld defects. The results demonstrate that ultrasonic TOFD technology can reliably detect weld defects, precisely measure defect depth, and clearly visualize defect distribution through imaging. Moreover, the traceable inspection data facilitate subsequent analysis, evaluation, and quality control. Therefore, the proposed ultrasonic TOFD-based non-destructive testing method offers a practical and effective approach for assessing weld quality and evaluating the structural stability of large-diameter water supply pressure steel pipes.


